Sunday, November 27, 2016
Sunday, August 9, 2015
Sunday, June 14, 2015
Roadwork (Tutorial)
I was attracted to the subject mostly because of the red and yellow high visibility dyes and paints used in the barrels and on the front end loader and also because of the viridian- tinted glass. I also like the jagged texture of the tires on the loader and thought it would be fun and challenging to try to suggest the tread.
Construction scenes are so colorful! Who doesn't look forward to getting stuck in road construction?
Construction scenes are so colorful! Who doesn't look forward to getting stuck in road construction?
Finished Painting:
I start with the largest shapes first. like the orange and white rectangles that make up the barrels The highlights are added later. Most subjects can be seen as an arrangement of simple shapes such as squares, circles, ellipses, cylinders, triangles. Learning to draw these shapes in perspective. Eg. The left edge of the scoop in the front end loader can be seen and interpreted as a simple receding triangle.
I continue to add smaller details like the lights in the van's headlights. Note that the front end loader and the right- most construction barrel appear to be hovering above the pavement as if somebody just switched off the gravity.
By adding shadows under the barrel and under the front end loader I solve the levitation issue. I bump up the light in the sky near the horizon to increase overall contrast. If your landscapes every seem too flat (if they lack contrast,) first look to lightening the sky near the horizon.
 |
| Roadwork 11x14 |
Here you can see several stages of the painting present in one image. I started with a contour line drawing on a light grey toned canvas. Using mostly flats I brushed in large washes in the road and sky. Using a limited palette I began mixing and painting in the local colors on the front end loader, trying to match the hue, value, and saturation of the subject's colors. (If needed see the color mixing tutorial for help with mixing.)
.
I start with the largest shapes first. like the orange and white rectangles that make up the barrels The highlights are added later. Most subjects can be seen as an arrangement of simple shapes such as squares, circles, ellipses, cylinders, triangles. Learning to draw these shapes in perspective. Eg. The left edge of the scoop in the front end loader can be seen and interpreted as a simple receding triangle.
I continue to add smaller details like the lights in the van's headlights. Note that the front end loader and the right- most construction barrel appear to be hovering above the pavement as if somebody just switched off the gravity.
By adding shadows under the barrel and under the front end loader I solve the levitation issue. I bump up the light in the sky near the horizon to increase overall contrast. If your landscapes every seem too flat (if they lack contrast,) first look to lightening the sky near the horizon.
Saturday, May 30, 2015
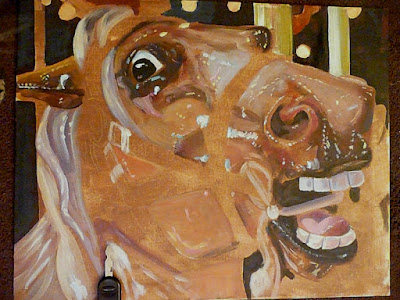
Toning the Ground with Burnt Umber: Carousel Step by Step Demo
The Finished Painting:
 |
| Carousel 16x20 (Sold) |
The reference photo:
I started by toning the entire 16x20 canvas panel with acrylics burnt umber. I then drew in the contours of the drawing with a yellow pastel pencil. I then brushed in the darkest darks and the lightest lights.
I then began palette mixing and applying the local colors, focusing on mixing the correct hue, value, and saturation level of each color. Mixing the exact color you need or desire is tremendously important. If you need help with color mixing check out the color mixing demo.
Never assume you have the correct color mixed. Take the time to paint of swatch of what you have mixed on your palette and visually compare your mixture to the actual color on the reference.
Acrylics dry quickly, so I'm able to paint in crisp, thick highlights over flatter, duller passages during the same painting session if desired.
I chose to add more detail to the center of interest (the eyes, nose, and mouth) and to include less detail in the outlying areas of the hair, neck, and background.
The finished painting:
 |
| Carousel 16x20 |
Building On A Two Value Underpainting
I started by coating the entire canvas in pure black acrylic paint. (If desired another color -like umber for example, can be substituted for blac k.) I then used white charcoal to indicate only the lightest areas in the composition, creating my two value 'statement.'
Next I painted over the charcoal with white acrylic gesso. Nearly the entire story is told with simple shapes and only two values.
I then palette mixed the home colors and started brushing them in transparently. The various passages naturally conform to the light/dark value structure set up in the previous step. The light passages stay lighter and the dark passages remain darker. (If you need help with mixing color see my color mixing tutorial )
I continue to palette mix and apply the paint. I make final value adjustments and paint in smaller details. I lightened the pavement to create more contrast with the row of cars.
 |
| Easton Detention Center 11x14 |
Thursday, May 28, 2015
Subscribe to:
Comments (Atom)


